Welcome to Linum’s documentation!


Linum is a tool for tasks visualization — like Gantt chart, but more compact.
Linum GitHub project page.
Description
If you need to visualize your schedule or working plan you are welcome to use Linum. Actually, you are able to use Gantt charts, but they are overloaded with extra information if you have many simple tasks. Gantt charts are better when tasks are sequential and connected between themselves.
Linum allows you to visualize your information on chosen time interval (week, month, year) like a timetable briefly and convenient.
Supported output formats
Console
Text (.txt)
Excel (.xlsx)
SVG (.svg)
Coming soon output formats
HTML (.html)
InDesign (.idml)
Render examples
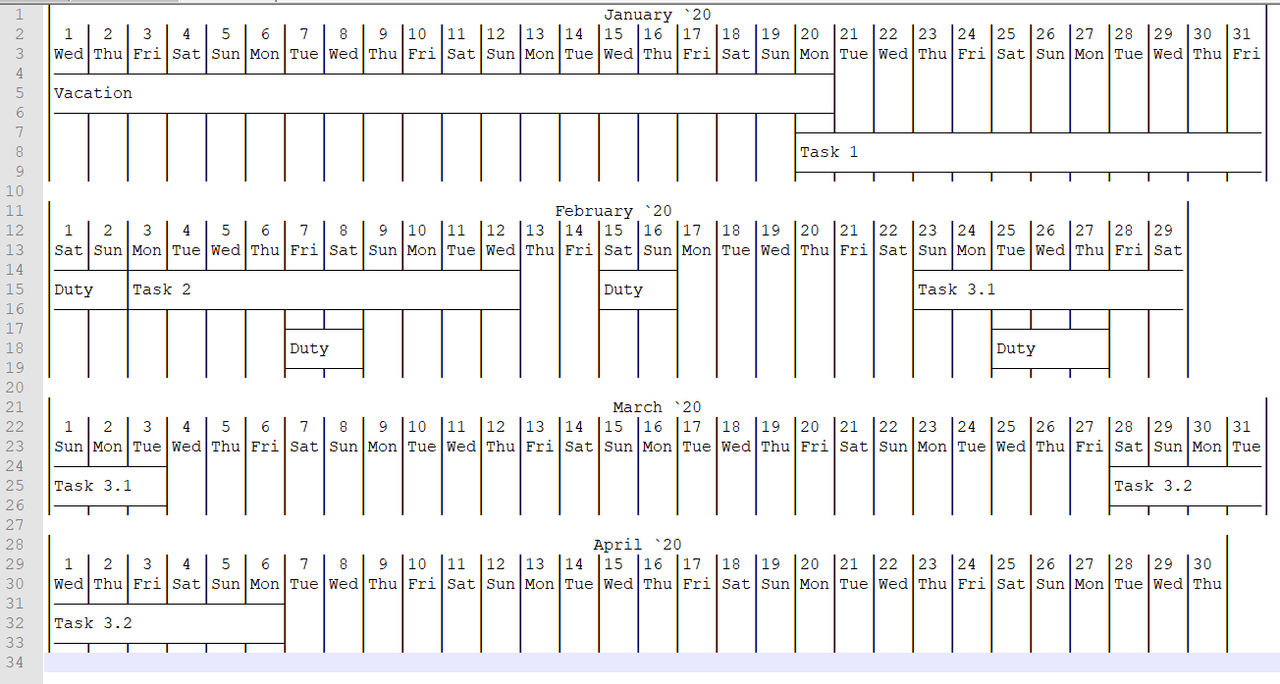
TXT renderer
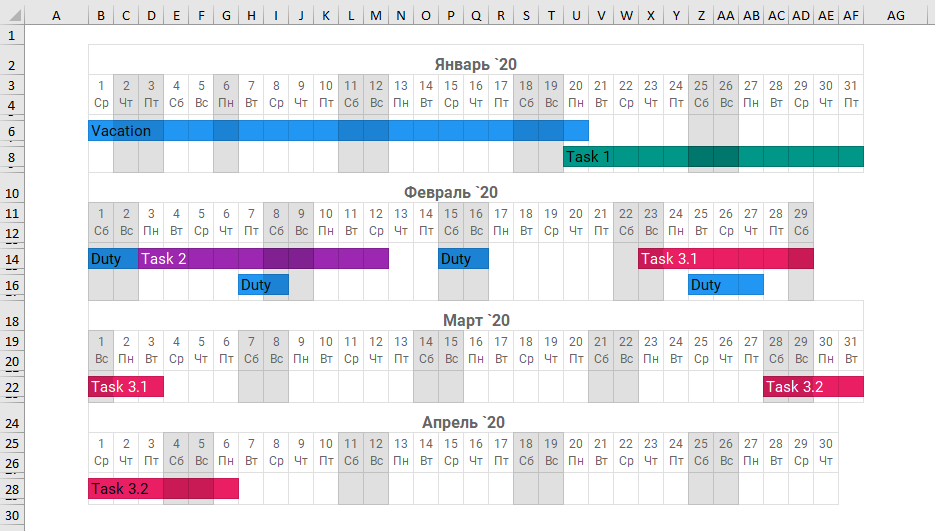
XLSX renderer
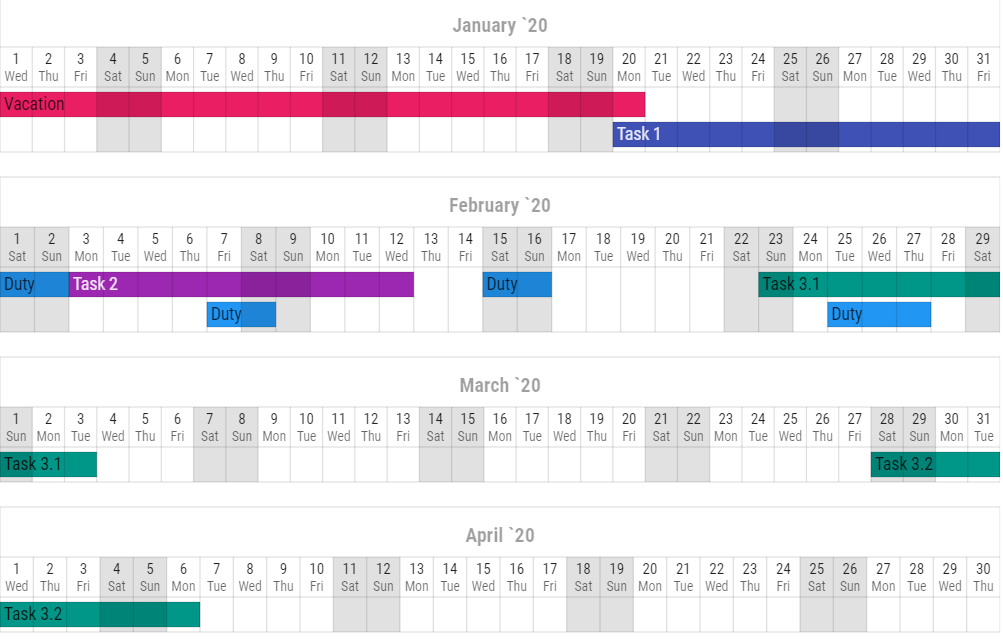
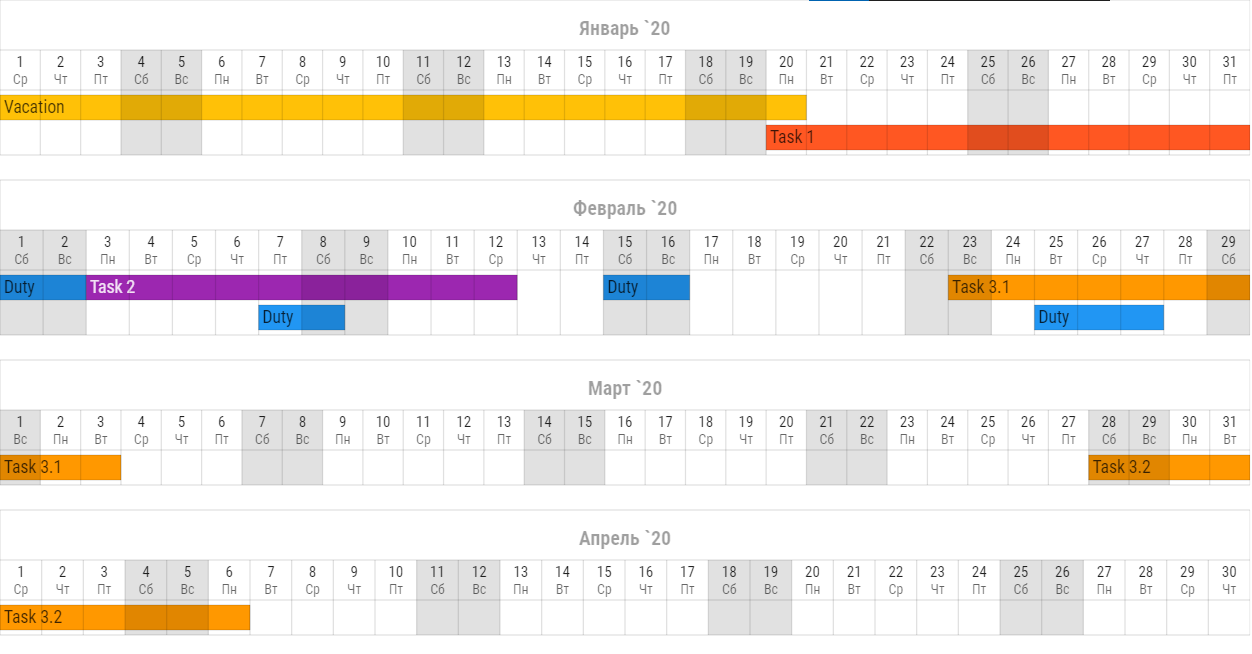
SVG renderer
All the date titles correspond your language version of Excel. In this case all titles are shown in Russian locales.
Contributing
For now Linum is ready to go for rendering your tasks in several formats on a chosen time interval. Feel free to improve the project and develop any new output formats.
Author
Table of content
Usage
There are two ways to use Linum. First - via console, and second - via API.
For generating output file it requires to create input file with tasks. You may read here how to do it.
Also to control render settings you need to create context file. Read Creating context for more information.
Installation
Install Linum via pip:
$ pip install linum
Console usage
After installation linum command becomes available.
Here is the latest help info:
$ linum --help
Usage: linum [OPTIONS] TASKS_PATH

Command line interface for linum.

Options:
 -o, --out PATH                  Output file. If not specified then linum
                                 creates new file in current directory.
 -r, --renderer [CONSOLE|TXT|XLSX|SVG]
                                 Renderer to use. 'CONSOLE' - for console
                                 printing. 'TXT' - for rendering txt file.
                                 'XLSX' - for rendering xlsx file. 'SVG' -
                                 for rendering svg file. Default is
                                 'CONSOLE'.
 -c, --context PATH              Context for renderer. It is YAML file with
                                 render settings. If not specified then
                                 default settings will be applied.
 --help                          Show this message and exit.
Using via api
Linum provides public render classes to generate schedule. There is one renderer for every output format.
To use them in simple way you must specify path to yaml tasks file,
and call .render() method. That`s all!
from linum import ExcelRenderer, TxtRenderer, ConsoleRenderer

TASKS_PATH = 'path/to/tasks.yaml'

# Console output
cr = ConsoleRenderer(TASKS_PATH)
cr.render()

# Txt output
tr = TxtRenderer(TASKS_PATH)
tr.render()

# Xlsx output
er = ExcelRenderer(TASKS_PATH)
er.render()

# Svg output
sr = SvgRenderer(TASKS_PATH)
sr.render()
If you have your yaml context file, provide valid path to it after task path.
from linum import ExcelRenderer, TxtRenderer, ConsoleRenderer

TASKS_PATH = 'path/to/tasks.yaml'
CONTEXT_PATH = 'path/to/context.yaml'

# Xlsx output
er = ExcelRenderer(TASKS_PATH, CONTEXT_PATH)
er.render()
As an option you may specify output file name.
from linum import ExcelRenderer, TxtRenderer, ConsoleRenderer

TASKS_PATH = 'path/to/tasks.yaml'
CONTEXT_PATH = 'path/to/context.yaml'
XLSX_OUT_PATH = 'path/to/new/xlsx/file.xlsx'

# Xlsx output
er = ExcelRenderer(TASKS_PATH, CONTEXT_PATH, XLSX_OUT_PATH)
er.render()
Creating tasks
To produce tasks you need to create text file in YAML
format (.yaml extension).
It isn`t necessary for you to know all yaml syntax.
All you need is be careful with number of spaces per indent
(There is no requirement in YAML to indent any concrete number of spaces,
but you need to use the same number of spaces in all your YAML file)
and read this article.
Basic
Let`s create the first task. Here is the simple example:
1My first task:
2  start: 2020-01-01
3  length: 5
In the first line you specify task name. It may be any string you want.
After task name must be symbol :
To specify properties for task you need to write indent and key-value pair.
Key and value separated by symbol : and one space symbol after it.
In the second line after date keyword you specify date when task starts.
All dates must be in format <year>-<month>-<day>.
If you don`t specify start date Linum will consider it as a current day.
And in the third line after length keyword you specify length of a task.
If you don`t specify length it will consider as one day length.
All lines with keywords are optional, but you must specify at least one of them.
Length or finish
You may use finish keyword instead of length to specify date when task is over.
If both of keyword were used then finish would be in priority.
1My second task:
2  start: 2020-01-10
3  finish: 2020-02-10
Color
You may specify color to render for certain task.
To do it use color keyword and hex rgb integer as value.
1Red task:
2  start: 2020-02-10
3  color: 0xFF0000
If you don`t set color property then random color from material design palette will be applied.
Sub tasks
It is possible to specify sub tasks for certain task
using sub keyword. There are two ways to do it.
If you want to create several tasks with one name use list sub tasks.
If you want to create tasks with different names use dictionary sub tasks.
In both cases parent properties will be inherited for a child.
It is possible to specify sub tasks for sub tasks.
List sub tasks
In YAML list elements start by minus symbol and one space after it.
1 List Task:
2   length: 3
3   sub:
4     - date: 2020-01-01
5     - date: 2020-01-20
6       length: 4
7     - date: 2020-02-10
8       color: 0x000000  # Black color
For this example Linum will create 3 tasks. First starts at 2020-01-01, second starts at 2020-01-20 and has length 4 days, and third starts at 2020-02-10 and has black color.
Dictionary sub tasks
For every dictionary sub task title would be computed as parent name plus sub task name.
1Task 1.:
2  color: 0x00FF00
3  length: 3
4  sub:
5    1:
6      start: 2020-03-01
7    2:
8      start: 2020-03-05
9      finish: 2020-03-08
For this example Linum will create 2 tasks: “Task 1.1” and “Task 1.2”.
Creating context
Context, like tasks, is a text file in YAML format
(.yaml extension).
In context file you determine render period, style settings,
list of workdays and list of days-off.
Base structure
Context consists of several optional sections:
periodsection for specifying base period settings;workdayssection with list of dates which Linum must consider as working days;days_offsection with list of dates which Linum must consider as days-off;txt_renderersection for overriding period settings and specifying styles for console and txt render;xlsx_renderersection for overriding period settings and specifying styles for excel render.svg_renderersection for overriding period settings and specifying styles for svg render.
All this sections may be in no particular order or be absent.
Days-off and working days
By default Linum considers all Saturdays and Sundays as days-off
and other weekdays as working days.
If you want specify day as day-off you must indicate it in days_off subsection.
days_off:
  - 2020-01-01
  - 2020-01-02
  - 2020-01-03
If you want to indicate certain Saturday or Sunday as working day
you must specify it in workdays subsection.
workdays:
  - 2020-01-04
  - 2020-01-05
If one date is in both sections then workdays section will be in priority.
Render period
period section specify base period settings.
period:
  start: 2020-01-01
  finish: 2021-01-01
  months_in_row: 2
start
Specifies date when period of view begins.
Value is date in format <year>-<month>-<day>.
If not stated, then Linum will consider it as today date.
length
Specify when period of view is over after start date.
Value must be integer.
finish
Specify when period of view is over.
Value is date in format <year>-<month>-<day>.
If both of length and finish are stated then
finish will be in priority.
months_in_row
Specify how many months must be in one row. Value must be integer.
Renderer custom
There are 3 main renderers in Linum. Each renderer has custom view settings that may be determine:
Txt renderer
txt section overrides period settings and specifies
styles for console and txt renderers.
You may override period settings specially for txt renderer. Use params from Render period section for it, for example:
start: 2020-01-01
finish: 2020-02-01

txt:
   finish: 2021-01-01
Cell size
To determine cell size use cell_width keyword. Value must be integer.
txt:
  cell_width: 5
Borders
There are some border settings for txt renderer.
txt:
  inner_borders: False
  month_inner_borders: True
  left_border: True
  right_border: True
inner_borders
Determines border presence between days.
Value must be True or False.
month_inner_borders
Determines border presence between months.
Value must be True or False.
left_border
Determines left border for resulted render.
Value must be True or False.
right_border
Determines right border for resulted render.
Value must be True or False.
Xlsx renderer
xlsx section overrides period settings and specifies
styles for excel render.
You may override period settings specially for xlsx renderer. Use params from Render period section for it. For example:
xlsx:
  start: 2020-06-01
  finish: 2020-07-01
To determine excel styles you need to use styles sub section.
Note
Using styles subsection drops all default style settings.
You can see default theme in linum/styles/xlsx/xlsx_default_context.yaml file.
xlsx:
  styles:
    font: Roboto
    cell_width_px: 30
For this example new font and cell width would be applied to all cells.
In styles section and all of it sub sections you may use params.
Details of using this params will be provided later.
If you want to determine cell style in certain hierarchy place
you must use correspond sub sections.
There is 3 sub sections for styles section:
headerto determine header style;layersto determine layers styles;days_offsub section includesheaderandlayerssubsections, and need to determine cell styles in days-off positions.
xlsx:
  styles:
    header:
      # some header styles
    layers:
      # some layers styles

    days_off:
      header:
        # some header styles for days-off
      layers:
        # some layers styles for days-off
The header sections contain 3 sub sections:
monthssub section to determine months cell style;dayssub section to determine days cell style;weekdayssub section to determine weekdays cell style.
xlsx:
  styles:
    header:
      months:
        # some months styles
      days:
        # some days styles
      weekdays:
        # some weekdays styles

    days_off:
      header:
        months:
          # some months styles for days-off
        days:
          # some days styles for days-off
        weekdays:
          # some weekdays styles for days-off
The layers sections contain 3 sub sections:
space_rowsub section to determine cells style between layers;spacesub section to determine cells style between tasks in one layer;taskssub section to determine tasks cell style.
xlsx:
  styles:
    layers:
      space_row:
        # some space row styles
      space:
        # some space styles
      tasks:
        # some tasks styles

    days_off:
      layers:
        space_row:
          # some space row styles for days-off
        space:
          # some space styles for days-off
        tasks:
          # some tasks styles for days-off
Note
For days-off section all sub sections inherit matching properties
from styles section.
For example:
xlsx:
  styles:
    header:
      days:
        bg_color: 0x00FF00  # Green color

    days_off:
      header:
        days:
          font_size: 16
all days-off will be green.
Cell size
cell_width_px
Sets cell width in pixels. Value must be integer.
cell_height_px
Sets cell height in pixels. Value must be integer.
Setting font
Example:
xlsx:
  styles:
    font_name: Roboto
    font_size: 16
    font_color: auto
    bold: False
    italic: True
    underline: True
font_name
Font to use. Value must be string with proper font name.
font_size
Font size. Value must be integer.
font_color
Font color. Value must be integer constant color
or auto for auto choosing between black and white color.
In second case color choose depends on background contrast.
bold
Sets font bold. Must be True or False
italic
Sets font italic. Must be True or False
underline
Sets font underline. Must be True or False
Align
Example:
xlsx:
  styles:
    align: center
    valign: top
align
Horizontal cell aligning. Must be one of left, right, or center.
valign
Vertical cell aligning. Must be one of top, vcenter, or bottom.
bg_color
Background color. Must be integer for constant color or Null for setting off color.
xlsx:
  styles:
    bg_color: 0x000000  # Black color
Blackout
Blackout is changing color mixing it with solid black with
blackout_value percents opacity.
Blackout changes background color and border colors.
Example:
xlsx:
  styles:
    use_blackout: True
    blackout_value: 0.12
use_blackout
Sets blackout for cell. Must be True or False.
blackout_value
Blackout value. Value must be in percents (float value between 0.0 and 1.0).
Cell borders
A cell border is comprised of a border on the bottom, top, left and right.
The following shows the border styles:
index |
description |
weight |
|---|---|---|
0 |
None |
0 |
1 |
Continuous |
1 |
2 |
Continuous |
2 |
3 |
Dash |
1 |
4 |
Dot |
1 |
5 |
Continuous |
3 |
6 |
Double |
3 |
7 |
Continuous |
0 |
8 |
Dash |
2 |
9 |
Dash Dot |
1 |
10 |
Dash Dot |
2 |
11 |
Dash Dot Dash |
1 |
12 |
Dash Dot Dash |
2 |
13 |
SlantDash Dot |
2 |
Use index integer value to set border, or Null to deactivate border style.
Example:
xlsx:
  styles:
    left: 0
    right: 1
    top: Null
    bottom: 10
left
Left border style. See style values here: Cell borders.
right
Right border style. See style values here: Cell borders.
top
Top border style. See style values here: Cell borders.
bottom
Bottom border style. See style values here: Cell borders.
Border colors
To set border color use hex rgb integer values or blackout keyword.
In second case border color is equal cell background color with blackout.
Example:
xlsx:
  styles:
    left_color: 0x000000  # Black color
    right_color: 0xFF0000  # Red color
    top_color: 0x0000FF  # Blue color
    bottom_color: blackout
left_color
Color for left border. See possible values here: Border colors.
right_color
Color for right border. See possible values here: Border colors.
top_color
Color for top border. See possible values here: Border colors.
bottom_color
Color for bottom border. See possible values here: Border colors.
Svg renderer
svg_renderer section overrides period settings and specifies
styles for svg render.
You may override period settings specially for svg renderer. Use params from Render period section for it. For example:
svg:
  start: 2020-06-01
  finish: 2020-07-01
To determine svg styles you need to use styles sub section and css file.
In styles sub section it is possible to determine some properties,
that can’t be set in css.
There are properties like cell size, padding and text align.
Note
Using styles sub section drops all default style settings.
You can see default theme in linum/styles/svg/svg_default_context.yaml file.
Localization
It is possible to localize weekdays and months names. To do it you need to set your locale string:
svg:
   locale: ru_RU
Calendar width
By default Linum sets svg width as screen width, but you can set custom width:
svg:
   width: 640
Width value doesn’t affect to height.
css
Css (Cascading Style Sheets) - is a text file in which you describe the presentation of a structured document like svg or html.
Every element in the generated svg has class tags
which can be used as references in css.
For example cell with day date has tags
cell, header, day and background.
Referencing to this element will be:
.cell.header.day.background {
   fill: #FFFFFF;
}
You may check element class tags using special developer tools in your browser.
In Google Chrome you may press ctrl + shift + c to activate it.
Note
Using css drops all default css style settings.
You can see default theme in linum/styles/svg/svg_default_style.css file.
After creating css file you can specify path to it for Linum:
svg:
   css: path/to/your/css.css
styles
There is 3 sub sections for styles section:
headerto determine header style;layersto determine layers style;gridto determine grid style.
style
For all sub sections in styles section it is possible to set up custom css style.
Use style keyword for it.
svg:
   styles:
      style: "font-family: Roboto Condensed;"
This style will have higher priority then styles from css file.
Linum styles
Linum styles is a set of style properties that can’t be set in css.
For example text element has absolute but not relative coordinates. Setting align for text in css will have no effect. In this case you need to use linum style settings.
Height
Use height key to set element height in px. Example:
svg:
   styles:
      height: 100
Padding
Example:
svg:
   styles:
      padding-left: 1
      padding-right: 2
      padding-top: 3
      padding-bottom: 4
padding-left sets left padding in px.
padding-right sets right padding in px.
padding-top sets top padding in px.
padding-bottom sets bottom padding in px.
Borders
It is possible to create individual borders for cells. Example:
svg:
   styles:
      left: True
      right: True
      top: True
      bottom: True
left creates left border for cell.
right creates right border for cell.
top creates top border for cell.
bottom creates bottom border for cell.
Align
To set align for text element you need to use both css and linum styles.
With css style you set anchor point and with Linum styles you set aligning for this point.
For example, if you need your text in top right corner you must write this in your context file:
svg:
   styles:
      align: right
      valign: top
and this in your css:
.text {
   dominant-baseline: hanging;
   text-anchor: end;
}
align key sets horizontal align.
Value must be one of: left, center or right.
valign key sets vertical align.
Value must be one of: top, vcenter or bottom.
Cells styles
Linum’s calendar header consists of cells. Tasks are cells too. There are two keys for each cell:
backgroundto determine background style;textto determine text style.
use Linum styles to determine background and text sub sections.
svg:
   styles:
      header:
         days:
            text:
               valign: vcenter
               align: center

            background:
               style: "opacity: 0.87;"
Header
In header section you may determine header style.
All of Linum styles may be used in header section
and in it’s sub sections.
There are three sub sections in header section:
monthsto determine months row style;daysto determine days row style;weekdaysto determine weekdays row style.
svg:
   styles:
      header:
         align: center

         months:
            valign: bottom

         days:
            valign: vcenter

         weekdays:
            valign: top
Months, days and weekdays are cells. So you may use for them Cells styles.
Layers
There is layers sub section to determine styles settings of calendar layers.
To set indent between calendar layers use indent key:
svg:
   styles:
      layers:
         indent: 20
Tasks
tasks is a sub section of layers.
In tasks you may use all Cells styles and two other keys:
indentto set vertical indent between tasks;auto-font-colorto set auto font color.
svg:
   styles:
      layers:
         tasks:
            height: 20
            indent: 4
            auto-font-color: True

            text:
               align: left
Grid
There is only one key for grid subsection. It is style.
See style for information how it works.
svg:
   styles:
      grid:
         styles: "stroke-opacity: 0.12;"